
|
|
|
||||||||
|
|
|||||||||
| Home | Forums | Register | Gallery | FAQ | Calendar |
| Retailers | Community | News/Info | International Retailers | IRC | Today's Posts |
 |
|
|
Thread Tools |
|
|
#1 |
|
AUG home made auto wind drum mag (56k warning)
It's about 20 pic's
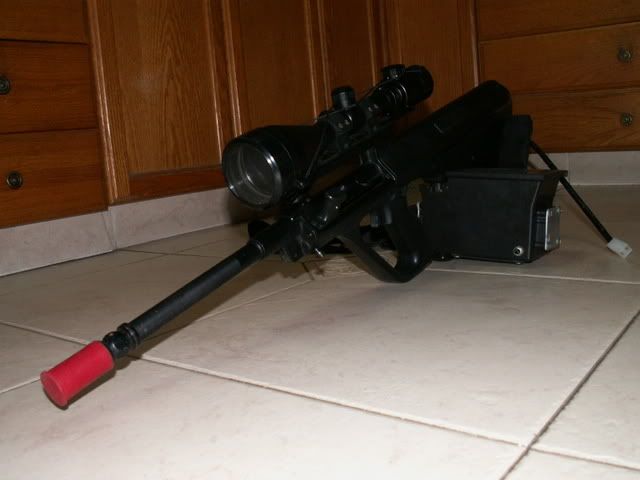
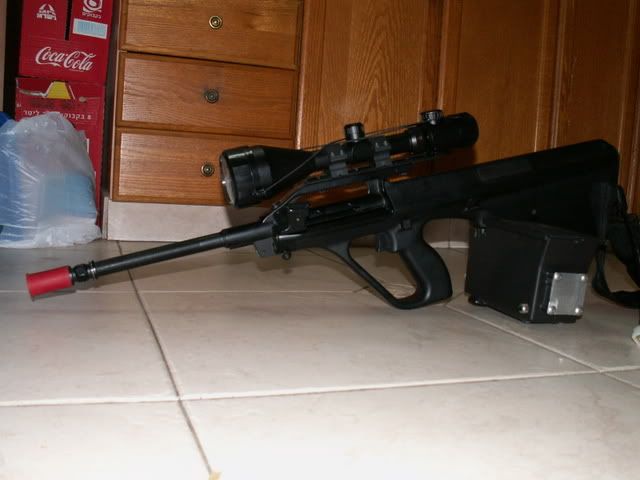
Since the only off shelf AUG auto wind drum mag cost about 175$ (not including shipping and customs), pre ordered and only 1000 bb's capacity, I've decided to build my own. parts used: ABS plastic storage compartments that were removed from small Mitsubishi pickup while installing CD players in them - free. Chinese AUG Hi cap mag - got it for free from a friend of mine. 6v motor with 3 gears torque up system - carefully removed from a dead CD player, again free. 6v rechargeable battery pack unknown miA or type - free from another friend very old type Chinese AEG. Electric supplies and other materials such as wires, switch, connectors, isolating tape and heat shrink, glue... - courtesy of my old working place. Men hours - somewhere between 5 to 10 depending on your skills Costs - almost free Capacity - 2500+ bb's On to the build up I took 2 plastic dashboard parts and removed one of their side wall's (which will be used later to create the cover).      I cut those 2 pieces to the exact width so I can fit in the mag, I also made a hole in the bottom that wraps around the mag and allows me to work manually if needed and catches the mag in place. I attached those 2 pieces together using aluminum plats and the original screws.    I've opened to holes in the mag body, one in front of the main manual gear (the bottom one) in order to connect it to the motor, the 2nd is on top of the inside mag gears and it's for feeding the bb's from the box to the mag. Inside the box I built a buffer that will channel the bb's to their place.    I closed the remaining unwanted holes with plastic and epoxy glue and built the top cover from the 2 side walls removed in the first section. I've placed inside governors that allow me to open the lid a bit to check on the bb's or open it wide for very quick loading.     Beneath the buffer I placed the motor and gear set and the battery, the switch is facing the front, that way I can push it with my elbow while shooting.      
|
|
|
|

|
|
|
#2 |
|
neat build.
but why would you want something so you make more noise then the gun shooting?
__________________
www.ferroconcepts.com |
|
|
|

|
|
|
#3 |
|
No pics of that thing actually loaded into the gun?
__________________
Airsoft It's all fun and games until someone gets hurt...and then it becomes sport! |
|
|
|

|
|
|
#4 |
|
Trust me, once I squeeze the trigger, you don't here any rattling bb's, I need it because this AUG functions as a LSW, can't be done properly with 330 mag's.
Sorry for the dark pic's, the whole house is asleep. The original front grip is removed because I'm in the middle of making a nice bipod support and M60 type bipod's for it.   
|
|
|
|

|
|
|
#5 |
|
you just need an H-Bar barrel now
|
|
|
|

|
|
|
#6 |
|
AK Guru
|
Lefty-only setup eh? Interesting work.
__________________

|
|
|

|
|
|
#7 |
|
I'm gonna run with L86A2 look alike setup for supporting the bipod's, I don't trust the outer barrel to support the extra whight.
And I'm right handed, the drum is infront of my chest. |
|
|
|

|
|
|
#8 |
|
vision impaired
|
Wow that's really neat for something built out of mostly free stuff.
|
|
|

|
|
|
#9 |
|
Thats a pretty clever build... I hope to see more of your work on the front end. I've been looking for ideas to replace my front grip as well.
|
|
|
|

|
|
|
#10 |
|
Looks like a righty set up to me, not sure how you'de ever manage to wrap your left forearm around that thing...
|
|
|
|

|
|
|
#11 |
|
Ahh, I don't know. Size does matter?
 
Last edited by Bulldog-IL; December 7th, 2007 at 15:23.. |
|
|
|

|
|
|
#12 |
|
A bit bulky, but still, a most ingenious design, I think. Awesome work.
__________________

|
|
|
|

|
  |
|
||||||
| Bookmarks |
|
|
 |